Game Difficulty and the Four Phases of FF7
In the first section, on the history of the RPG form and FF7’s place in that history, I talked about how the form of an RPG affects its style and content. The transition from the tabletop space to the digital space necessarily caused the design of RPGs to change. We’ve already seen how the limitations of the digital space—combined with the astonishing completeness of D&D—led to RPGs that focused on one or two aspects of the form. But there are other changes that arise from the transition to videogame form, and one of them is the adoption of orthodox videogame difficulty structures. Between 1978 and 1986, there was a tremendous amount of evolution in the design of conventional videogames. Final Fantasy 1 was released in 1987. It only makes sense that FF titles would be influenced by this evolution.
Two principles form the foundation of videogame design. The first principle is that games should generally become more challenging the longer they are played. The second is that this increase in difficulty is not purely linear, but rather goes up and down.[51] Both of these concepts are important to the design of FF7, but I want to address the latter concept first. Final Fantasy 7 alternates easier and harder quests throughout the game, and many statistical measures reveal this pattern. With a few exceptions, the difficulty of FF7 dungeons features a reliable pattern of tension and release that can be charted clearly. On the other hand, the way in which the designers create a game-long increase in difficulty is much more complicated. The big problem that the FF7 designers face when trying to turn up the difficulty across the course of their game was that many of the traditional RPG mechanisms for increasing difficulty don’t fit the voice or structure of their game. Tactical party composition had already disappeared in FF6 in favor of a party made up of whomever the player wanted to use for plot-and-character reasons. As we’ll see, this doesn’t leave the design team without tools. Even without tanks, dedicated healers, and fragile spellcasters, the designers have ways of keeping the game interesting. Debuffs, elemental resistances, specially-structured attacks and changes in enemy base stats are a few of the traditional ways that the designers were able to modify the difficulty of battles. Novel structures in the design of the level-up system are another way of playing with game difficulty. Overall, the game breaks down into four phases, each of which represents a different approach to making the game challenging.
- The first phase is an introduction during which the player learns the game’s basic mechanics and can push through most of the content without much critical thinking or knowledge about the game.
- The second phase adds difficulty by inconveniencing the player in various ways over long periods of time, rather than concentrating danger in any one spot.
- The third phase of the game is almost the opposite of the second phase, in that it’s all about player characters and their enemies using high-powered attacks.
- The fourth phase of the game combines aspects of phases two and three, but also uses the level-up system in a novel way to create (and solve) difficulty.
Although the transitions between these phases are so smooth that many players miss them, we’ll see how the designers managed to pack quite a bit of nuance into FF7’s battles and level-up system.
One thing I want to address before diving into the section-by-section analysis is a prejudice which I have encountered many times when doing research on RPGs and JRPGs in particular. There exists a notion that all of the difficulty in a typical JRPG stems from inflation in the base statistics of enemy combatants. That is, JRPG battles become more difficult because monsters have increasingly large HP pools, abd attack and defense stats. This is not really the case with FF7; the truth of its difficulty is much more complicated. In addition to showing that FF7 is not the boring, stat-inflation game that some critics think it is, I also want to address the validity of this prejudice in general. There are games that do consist of a long, uphill battle against progressively higher monster stats. World of Warcraft is one example of this. Although the endgame (raid) content for WoW is actually somewhat nuanced and skill-based, most of the content prior to the endgame is simply a series of dungeons and quests that pit the player character against progressively stronger versions of the same old monsters, over and over again. Considering that this part of the game can take 50-100 hours to climb through (although this climb has gotten easier in more recent versions of the game), it’s fair to characterize the levelling phase of WoW as being exactly the sort of RPG that critics say requires more grinding than skill. Skyrim is another game which suffers from stat inflation as the primary means of challenge. The main difference between the enemies at the beginning of Skyrim and the enemies at the end is that the later enemies have more HP and better equipment. I am not the first person to point this out, but I think that critics of WoW and Skyrim tend to admit that to see those games only in terms of their battle systems is to miss the point. Skyrim and WoW are about more than just finding the next monster to kill. Indeed, most RPGs are about more than finding the next monster to kill. The exploration, atmosphere, character and storytelling aspects of RPGs are Dave Arneson’s enduring contribution to the genre, and ignoring those things is (in most cases) a needlessly reductive exercise.
I have to admit that when I looked at FF7’s statistical measures for the first time, I thought I might encounter the kind of inflation which I discuss above, but it wasn’t so. The easiest way to prove or disprove this notion is to look at how many physical attacks it would take to end a battle, as this is the most basic action a player can take. Physical attack damage can vary, so for my measure I used Red XIII’s physical attack as he falls roughly into the middle of the damage spectrum. Also, he joins the party during quest six (breaking into Shinra HQ), which is the point in the game where the party-size stabilizes at three members for the rest of the game. I measured his attack against every enemy, assuming that his character level is equal to the average enemy level for the quest in consideration (rounded down). For every quest in which there was a new weapon available, I figured that weapon into the calculation.
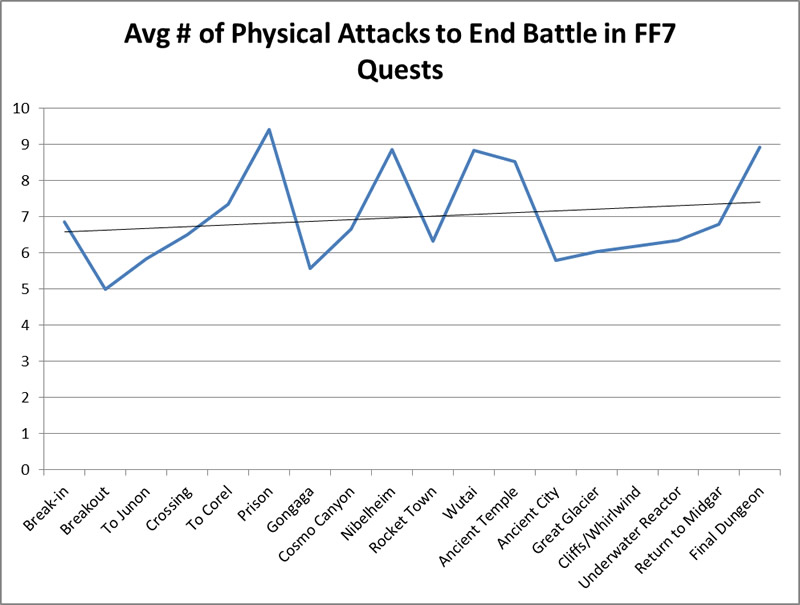
Over the course of the game, the number of physical attacks required to end a battle does go up slightly. That growth is considerably smaller than I expected, however. Moreover, the way the growth occurs is not in the manner that I expected, either. I did anticipate the possibility of the up-and-down motion of this graph—that some quests would be harder than others based merely on things like HP and defense. But the strange thing is that the average number of physical attacks required to end a battle (per quest) never goes much above nine attacks—not for the entire game! I thought that the battles in the hardest quests would require an average of eight attacks, then nine, then ten, then eleven, but my hypothesis was wrong. Instead of seeing the hardest quests getting harder (in terms of stats), we see the easiest quests getting harder, while the hardest quests stay the same. Or, in other words, the durability of the enemies in the easier quests grows, while the durability of the enemies in the harder quests stays mostly the same (in terms of basic physical attacks).
The fact that the average battle peaks at nine attacks is important, but how I arrived at that average is important as well. The FF7 designers appear to have imposed a consistent limit on the average duration of battles (measured in player turns). I don’t want to conceal the truth of the data from that graph, however. Each data point represents the average length of a battle per quest. Naturally, there are some battles that are higher than the average, and some battles that are lower. There are some battles whose statistical profile is so extreme that it skews the average of the whole quest. These battles generally fall into two groups: battles with an unusually large number of enemies, and battles with one huge enemy. The former category is about as simple as it sounds in terms of composition. These battles are made up of normal enemies in large quantities, and thus they scale normally in terms of EXP, AP and everything else. The only really interesting thing about these battles is that they disappear completely just before the Great Glacier quest. By my count, there are 48 random battles (not including chocobo battles) which contain either four or five enemies, but none after the player leaves the Coral Valley. How can we explain this? I think the answer lies in the player’s ability to use multi-target attacks. Battles with many normal enemies take a comparable amount of time to finish as battles with one very tough enemy—but only if the player relies entirely on basic physical attacks. The moment a player starts using multi-target abilities, he or she can finish the large-population battles in one or two turns. This isn’t true against those beefy enemies, since their HP is concentrated in one spot. As the game goes on, the player’s access to powerful multi-target attacks increases markedly, meaning that high-population/low-HP battles would be way too easy for a player who has the Slash-All Materia, or any of the many other skills which can wipe a battlefield clean of weaker foes. The harder enemies prevent the player from abusing multitarget abilities to gain EXP, AP and Gil at a rate that would break the game.
The “beefy enemy” category is a little more interesting from the perspective of individual battle design. The one-tough-enemy setup is typified by the single most durable random encounter in the game: Master Tonberry. The Tonberry appears in many FF titles, usually as exactly what he is in FF7—a monster with high HP and some deadly attacks. There’s no easy way around the Tonberry; he takes about 35 (average) physical attacks to defeat, and he has no glaring magical weakness to exploit. The Master Tonberry appears as a random encounter in the final dungeon, and so his toughness is completely understandable. There are other enemies like him from many different quests, however. The Blue Dragon of Gaea’s Cliffs takes an average of 15 attacks to subdue, while the Dragon of Mt. Nibel requires 13. The X-Cannon from the Return to Midgar requires 18 attacks to defeat, while the King Behemoth in the final quest requires 15. These enemies hand out an average to slightly above-average amount of EXP. The one exception is the Ying & Yang enemy from the Shinra Mansion, which takes a whopping 30 attacks to defeat, but which delivers about 57% less EXP than a typical battle in that zone. The reason is that Ying & Yang are a gimmick battle; one side is nearly immune to physical attacks and the other, magic. This is one of a very small number of gimmick battles in the whole game, but it does skew the data for the Nibelheim/Mt. Nibel area a little bit higher. Thankfully, there are not really any other significant instances of gimmick-based defenses in random encounters, and so the numbers on the physical attacks graph are a fair representation of the game as the player experiences it. (We’ll go over this in greater detail in the later section on enemy archetypes.)
Stat Inflation: Sometimes Meaningful, Sometimes Not
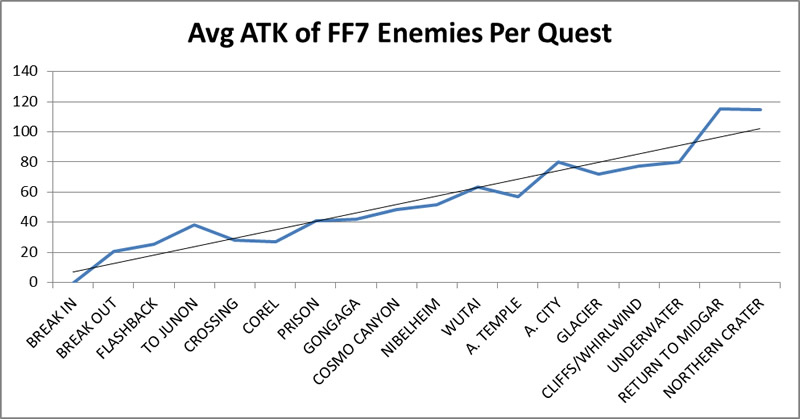
Looking at how many basic attacks go into a battle is the most consistent way to compare enemy durability across quests, as it accounts for level, HP, defense and even player-character statistics. That said, this method does not account for many of the other stats that enemies (and player characters) have. I expect that the first big question readers have regarding statistical inflation is about the enemy’s ability to do damage. Even if the average random encounter lasts no more than nine attacks across the course of the game, what the enemy can do during those turns is pretty important. I want to start out by simply looking at the average stats of enemies on a per-quest basis. Here is a graph of average enemy attack stats, per quest.
 [56]
[56]
You can see that there’s a very strong relationship between quest progression and enemy attack stats. This would seem like a clear indicator of increasing difficulty in the game except that it is mitigated by rising player defenses.
 [57]
[57]
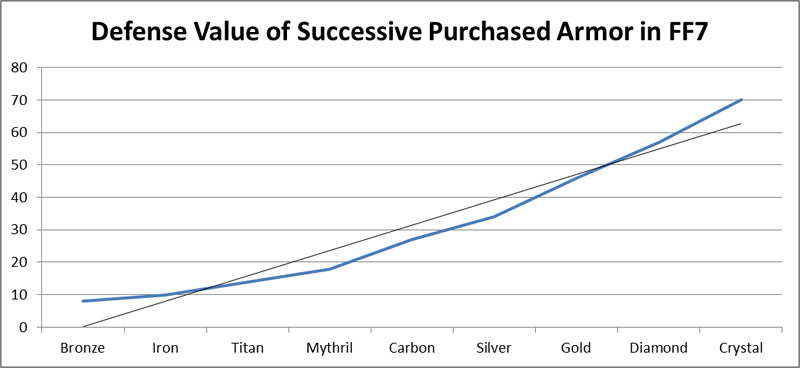
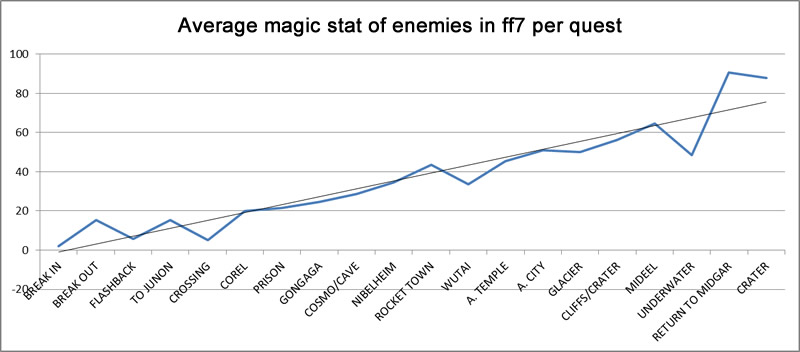
Enemy defenses and player attack power rise similarly, but that data is already baked into the durability graph above, and the relationship is neatly linear. This is a form of stat inflation; it doesn’t present the player with much to think about. It does force the player to buy new weapons and armor, and as we’ll eventually see, that’s meaningful; the acquisition of gil becomes more important during phase four. For most of the game, however, the player simply maintains his or her party’s stats in line with the inflation of enemy stats by buying stronger equipment. As far as enemy base damage and armor go, FF7 is guilty of boring stat inflation—at least until the final phase when the use of gil becomes a little more interesting. Although physical attacks and defenses inflate somewhat meaninglessly, the same is not true for magic and magic defenses. Enemy magic stats increase in a straightforward, linear fashion.
 [58]
[58]
Player magic resistances also rise commensurately, recreating the meaningless inflation of the physical defenses. I have on the graph the physical resistances throughout the game to show how, despite starting lower, the magic resistance on armor catches up to its physical counterpart pretty quickly. What saves the magic/magic defense dynamic from being too boring is that enemy magic defenses are quite a bit different.
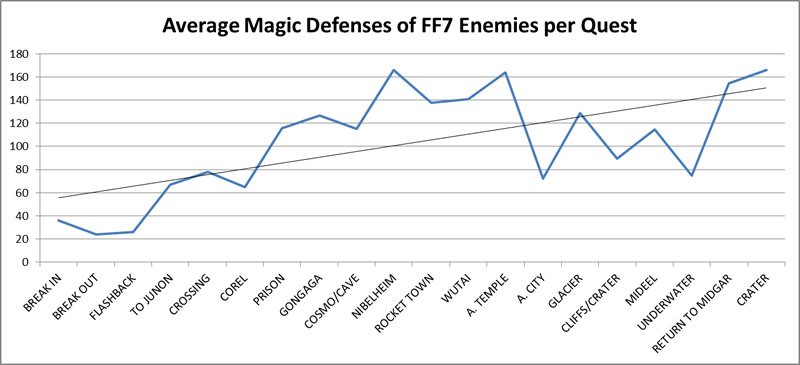 [59]
[59]
This is the first glimpse we get of the multi-phase structure of the game’s difficulty. Indeed, this drop-off in magic defense after the Temple of the Ancients was one of the first indications I had that FF7’s difficulty structure could be broken up into distinct phases. That surprising valley in the shape of the magic defense graph is a major part of phase three of the game, which represents a stark and sudden change in the way that battles challenge the player.
Although the mid-game valley in magic defenses is obviously significant, the early zenith of magic defenses is important too. The dialogue analysis shows us a clear “first peak” at the Temple of the Ancients, and the magic defense graph seems to coincide with that. The early peak is typical for a Squaresoft game, and appears in most FF titles from the 1990s, as well as in Chrono Trigger. This peak sits at the end of a long line of quests with high magic defenses, however. Why would earlier enemies be more magic-resistant than later enemies? This question led me to examine the portion of the game which goes from the Shinra Tower until the Temple of the Ancients, and to try to figure out why enemy defense stats would be distributed so counterintuitively. The answer to that question is what revealed the nature of phase two of the game. I’ll explain all that in the section on phase two, but the point I want to make here is that most of FF7’s statistical dimensions did not show boring, predictable and linear growth across the course of the game.
Phase One: Introduction
The first phase consists of the first five quests, from the opening bombing mission up through the destruction of the Sector 7 pillar. It is not easy (or helpful) to statistically compare the beginning of FF7 to the rest of the game for several reasons. The foremost reason is that the party size is not stable, moving between one and three player-characters across the first five quests. Although party composition is not tactically nuanced in this game overall, the player is frequently forced to carry party members who are under-leveled and underequipped during the first phase. Thus, the difficulty of each battle has to be calibrated to take into account a party of frequently varying size and power. There are many other reasons why this phase can’t really be put on the same graphs as other phases. There are relatively few shops during the first phase. The shops that do appear don’t offer weapons, armor or materia as often as they do in later phases. The rate at which the player acquires EXP and AP is different from the rest of the game. In essence, all of the ways in which the player characters would encounter and then master difficulty are different in this phase than they are later on.
Although it’s not terribly helpful to compare early statistical trends to the rest of the game in any great detail, the first phase does show the player all of the essential mechanics. Elemental resistances are a good example of this. The player only has basic fire, ice and lightning spells, but a huge number of enemies are weak against lightning, and so the player has plenty of chances to learn about enemy types and their elemental affinities. Meanwhile, only two enemies in random encounters are immune to a spell the player has. Both of those enemies are located in the Train Graveyard, which is part of the last quest in the phase. The designers are teaching the player through ease and power rather than difficulty and resistance. Similarly, the enemy’s use of debuffs is minimal and incomplete. (Debuff is the catch-all term for the family of spells which Final Fantasy calls “status effects.”) In the first phase of the game, there is only one enemy that can inflict slow, one that can inflict poison and one that can inflict silence. Two enemies can inflict sleep and two can inflict darkness. None of the really dangerous debuffs are present. Moreover, all of these debuff-using enemies are spread out so that no one zone in the first phase is especially rich in debuffs. This is in contrast to the later parts of the game which tend to concentrate debuffs heavily. The designers are introducing game mechanics, but not in a way that is particularly dangerous.
The underlying statistical elements in the beginning section don’t compare well with the rest of the game, but there are still some numerical elements which are indicative of the low level of challenge in the beginning of the game. The FF7 designers did themselves a huge favor when they constructed the damage formula for enemy combatants. Most of the enemies in the game have an attack which is equal to some multiple of their base attack damage. (I’m going to cover this in much greater detail in phase three, where it’s even more relevant.) For example, the formula for the Guard Hound’s special attack “Tentacle” is simply base damage*1.5. I call this modifier the component stat, in that it is a kind of contributing statistic that is a component of the ability itself rather than of the character casting it. The component stat is one of the clearest ways in which we can measure increasing difficulty across the course of the game.
In the first phase of the game, most of the component stats for most attacks made by non-boss enemies are below base damage*2. Only two enemies have attacks that equal or exceed that amount. Moreover, there are only two attacks in this phase that can hit multiple targets. Interestingly, the Hell House enemy in Sector 6 has the highest damage attack in addition to one of this phase’s only multi-target attacks.
Based on its location in the game, I think that the Hell House’s unusual damage output is in place to help Cloud learn his second limit break, but it also serves to teach players that some normal enemies are much more dangerous than others. Most enemies in the first phase aren’t like the Hell House. Highly damaging and multi-target attacks will become more prevalent across the course of the game, and players need to know about that. But in the first phase, most of the damage dealt by enemies is at or near the levels dictated by enemy base stats. Bosses in the first phase are different from normal enemies, and really, they’re also different from bosses throughout the rest of the game. Bosses in FF7 tend to have several shared characteristics: large pools of HP and MP, low physical defense, high magic defense and one or two dangerous attacks which are used infrequently.
Only about a third of bosses in the entire game have an elemental weakness, but all but one of the bosses in the first phase have an elemental weakness. (Of the bosses who do have elemental weaknesses, 60% of them are weak to lightning.) And while the high magic defenses of bosses make elemental weaknesses less meaningful, it’s still clear that the bosses in phase one are supposed to help teach the player to exploit any advantage. Bosses in phase one also do other unusual things. Many enemies in the game have counterattacks, and sometimes it’s not even clear when a counterattack is happening. The Guard Scorpion’s counterattack, on the other hand, is actually explained during the battle.
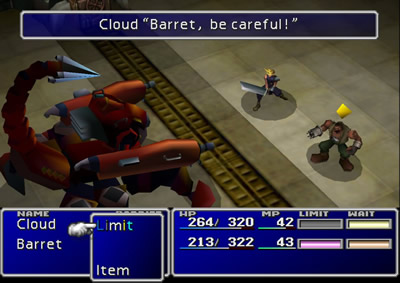
Many enemies and bosses have conditions under which they are more vulnerable, but the Air Buster (the game’s second boss) takes six times more damage when it is hit in the back. Many bosses use debuffs that require the player to target the victim with a cleansing ability, but Reno’s pyramid technique requires the player to specifically target the debuff itself, which is a great way to force players to think critically about debuffs. Overall, the bosses in the first phase are set up so that the player can see explicit versions of game design ideas that will be subtle in later phases of the game.
Phase Two: Abundant Inconvenience
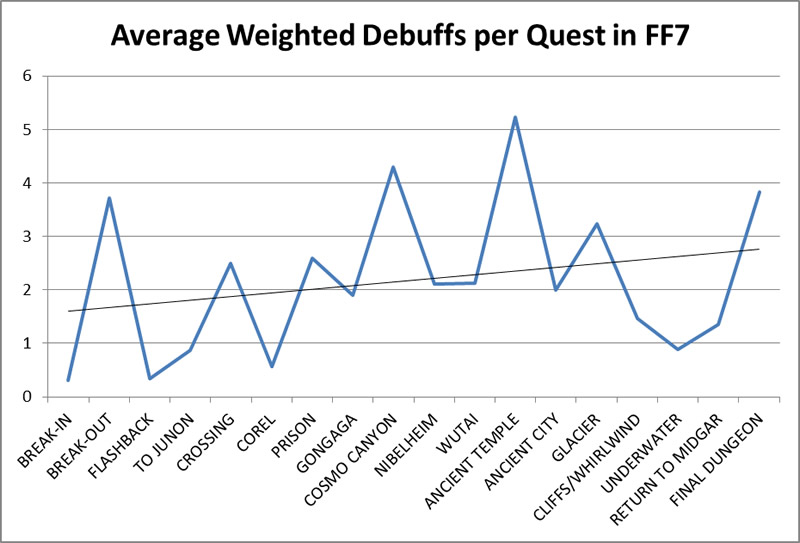
Phase two of FF7 is best characterized by an abundance of small inconveniences for the player characters which don’t really present a terrible danger, but which nevertheless make the game feel progressively more challenging. There are three design features which cause these increasing challenges. The first is an abundance of elemental resistances, which peaks surprisingly early in the game. The second is an abundance of low-level debuffs, which peaks around the Temple of the Ancients. The final feature is increases in magic defense, which also peak at the Temple of the Ancients. Although none of these are purely linear (because that would defy the essential voice of videogame design), they do see an overall increase toward a clear climax. In trying to understand the structure of phase two, it’s helpful to visualize the enemy’s use of debuffs.Charting the prevalence of debuffs confirms a clear, quantitative “first climax” of which we have already seen evidence of in the textual analysis and magic defense graphs. Below is a graph of debuffs starting from quest six (breaking into Shinra HQ), the point at which party size and party composition stabilize. The graph continues through the final incursion into the Northern Crater.
 [60][61]
To explain how I came to my conclusions about phases of the game, I want to explain how I represent the data here.
- 1. The quantity of debuffs is calculated on a per-battle basis, rather than on a per-enemy basis, because this is more accurate to the player’s experience of the game. Therefore, each data point represents the average number of debuffs that are available to be cast per battle in each of the quests.
- 2. The graph uses weighted data; some debuffs are worth more than others. Each debuff is weighted based upon the number of turns it costs to remedy. Debuffs like poison, blind, and silence can be removed in one turn by the character who is afflicted by them, and so get a score of one. Debuffs like confuse, paralyze, petrify and stop consume two turns; the character who is afflicted by the debuff loses a turn while afflicted, and another character spends a turn remedying the debuff. Those debuffs are thusly scored as twos. The only effect scored as a three is instant death, because it consumes the turn of the victim, a turn to revive, and a turn to heal the character that was just revived so they don’t die again immediately. Many enemy AI scripts are configured to target the character with the lowest HP, and so leaving a character in critical condition will result in another death. The spell life 2 (or the Phoenix summon) can reduce the number of consumed turns to two, but the Revive Materia takes a long time to level up, has higher-thannormal stat penalties, and costs a lot of MP to use. Thus, the number of turns spent on reviving the victim of an instant-death attack is only reduced at significant cost, and only if the player has properly prepared for it.
- 3. I have adjusted for the few instances where an enemy can only cast a debuff once or can only cast it when it is the last surviving enemy in the battle.
- 4. I have not included the Gelnika or Ancient Forest in this analysis as they have their own section later which explains the different rules those dungeons follow.
As you can see, the graph does not really go up steeply across the course of the game. If you plot a linear trend line for it, the r-squared value is less than 0.2. Still, there are a few things we can deduce from individual sections of the overall trend. The peak in debuffs around the Temple of the Ancients mirrors the peak in magic defense that occurs in that dungeon. Despite having seen that peak already, I expected that the use of debuffs across the whole game would increase, going from a few enemies that cast poison and slow spells to a large number of enemies who cast stop, paralyze and death. That was not the case. Instead, the difficulty in phase two of the game is mostly about inconveniencing the player with a large number of low-level debuffs rather than endangering him or her with a few higher-powered spells. The enemies in the Cave of the Gi are a good example of this. On the debuffs graph, Cosmo Canyon represents the highest point in the game up to that point, but the primary debuffs in the dungeon are poison and death sentence (which rarely takes effect in short battles). More rarely, the enemies will use paralyze, but it has a low hit rate. Poison isn’t particularly deadly, but in this dungeon there are usually several enemies in a battle that can apply it, and it will eat into the party’s HP. The same thing is true at the Temple of the Ancients. Enemies in this quest can apply poison, slow, sadness, darkness, frog, and berserk. (Two enemies can cast either paralyze or confuse, but do so much more rarely.) For the most part, these frequent, low-level debuffs are simply a way of lengthening battles and forcing extra effort out of the player without actually increasing the real risk of a game over.
While we’re on the topic of debuffs, I want to address a common criticism of FF7 and the series to which it belongs. There is a long tradition of criticizing certain FF titles (mostly FF4 through FF7) for filling the game with debuffs that benefit the party very little, but which benefit the enemies greatly. That is to say, when a party member attempts to inflict the silence effect, for example, the chances the spell will actually affect an enemy are quite low. This is a criticism that I think is true, but I think there is a structural reason for it. The average battle in FF7 should be over in about seven character turns if the characters do nothing but physically attack and never get a critical strike. Using any multi-target or enhanced-damage abilities will shorten battles even further. Even if the player were to successfully apply a debuff, that effect would barely have time to make a difference in the battle, so it’s not worth wasting a turn to try. Sometimes a debuff will be useful as part of another attack through the use of the Added Effect Materia, but such a technique rarely shortens battles by much. On the other hand, enemies can apply debuffs which last longer than the battle, which extend the amount of time spent in the battle, and which significantly increase the difficulty of those battles—especially if the player doesn’t have the remedy for them. Debuffs could still, in theory, be useful for the player in boss fights, since the greater length of the battle would give them time to have an effect. But most of FF7’s bosses are categorically immune to debuffs. Why does this need to be the case? Why couldn’t debuffs work on bosses for a few rounds and then wear off? Why couldn’t debuffs work against bosses but with reduced effectiveness? I can make no defense of this design decision; the designers simply missed an opportunity.
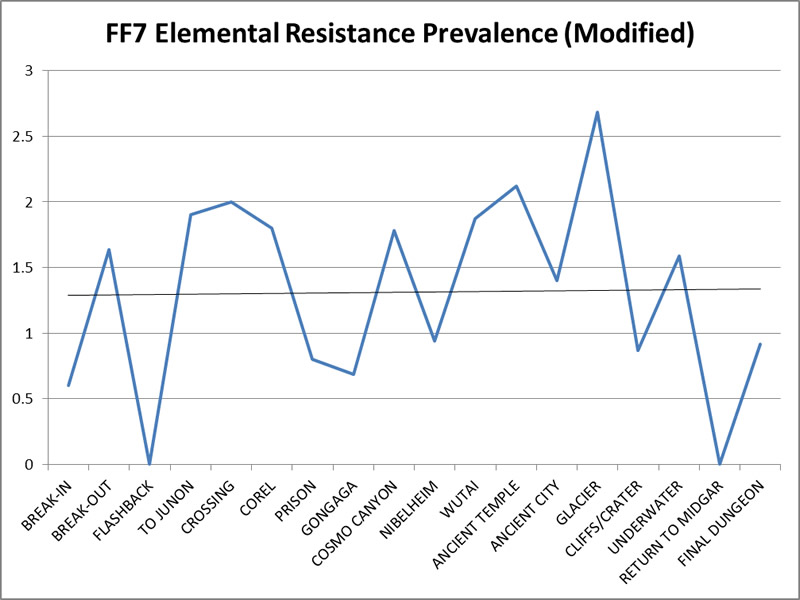
The incidence of elemental resistances follows a trend similar to debuffs, featuring a strong, up-and-down motion and a nadir where one might expect a zenith. For elemental resistances, I counted the raw number of resistances appearing in a battle. Even if every enemy in a battle had the same resistance, I counted each resistance as a separate instance. I felt that this was the best way to replicate a player’s experience of the game, since in the early going, many players would be reliant on one or two elemental attacks like Fire 2/All or the Shiva summon. The sight of four enemies resisting damage from such a spell is thusly replicated by giving such a battle a score of four (or more, if there are other instances).
 [62][63]
Again, there is an up-and-down motion, although this time there’s not as clear a peak around the Temple of the Ancients. In fact, the trend for the game is a slow, consistent drop in the prevalence of elemental resistances. The distribution of elemental resistances still reinforces the idea of phases in the game. Phase two has the most elemental resistances of any section, including the highest peak. Combine that with the relatively high magic defenses of enemies in this phase, and it’s clear the designers are creating another kind of abundant (but minor) inconvenience in that phase. Aside from the extremely early peak, I was most surprised by the nadir which comes at the end of the game. I honestly expected a reasonably strong upward trend in the overall prevalence of elemental resistances, and I am thrilled to be wrong because truth is usually more interesting than prejudice.
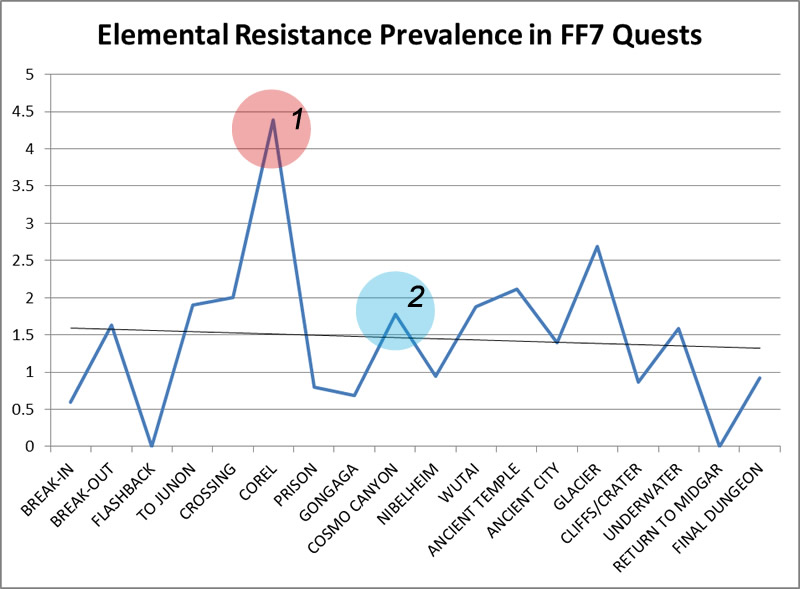
The up-and-down structure in the incidence of elemental resistances is almost certainly another case of the designers adhering to videogame orthodoxy and varying the difficulty of sequential quests. The line bounces around a lot from the very beginning and all the way through; there are no plateaus or valleys lasting longer than two quests. The most curious feature is the extremely early peak at Mt. Corel. I expect that almost nobody would name Mt. Corel as the one of the tougher dungeons, and yet it has the highest average incidence of elemental resistances per battle. So what are the designers trying to accomplish there? The answer is: nothing special. Mt Corel’s unusually high incidence of elemental resistances is inflated by an extremely abundant resistance to the earth element. The player could have bought the Earth Materia at Kalm, but because it costs 6000 AP to level up (whereas the Fire, Ice and Lightning Materia require only 2000 AP each), it’s not a likely candidate for use in clearing battles quickly by linking it to an All Materia. Moreover, the player has fire, ice and wind-based summons. So why do the designers insist on an earth resistance? It’s because the majority of enemies in the Mt. Corel quest are birds or monsters who have traditionally hovered above the ground in previous FF titles. By tradition, such monsters are immune to Earth, even though Earth is a virtual non-factor in this dungeon. This is what the graph looks like with the Earth resistances removed from that quest.
 [64][65]
This version of the graph looks a lot more consistent across the course of the game. Obviously, that’s not the true shape of the game, but it’s representative of what the player experiences. Only players focusing specially on the Earth Materia are going to actually perceive the impact of the bizarre, early peak in elemental resistance.
I want to dig a little deeper in phase two to illuminate some things which the graph doesn’t capture perfectly. After the early (and arbitrary) peak in elemental resistances, their prevalence decreases for a few quests before climbing again.
Similar to Mt Corel, the graph point representing the Cave of the Gi is propped up by resistance to one element. Almost every battle in the cave features several enemies with poison resistance. While the player certainly could be using a Bio 2/All combination, it’s pretty unlikely, because no enemies have been weak to the poison element by that point in the game. Still, elemental resistances are more common in that dungeon than normal. After a few more quests without much in the way of elemental resistances, Wutai and the Temple of the Ancients represent another high point. In these quests, the elemental resistances are not only plentiful but also varied. Enemies in these last two quests resist gravity, ice, fire, earth, water and lightning in mostly equal measure. This is more in line with what we would expect from the difficulty structure of phase two: lots of small inconveniences, rising in number and diversity near the phase’s final quest.
Bosses in Phase Two
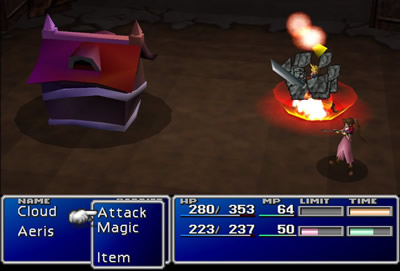
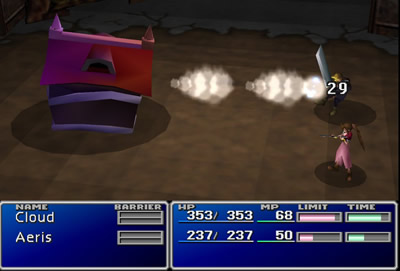
Bosses are an important part of the distinction between phases as well. Phase one bosses exist to highlight basic mechanics in the game, like back attacks, counter attacks, elemental weaknesses and debuffs. The bosses in phase two take the player on a kind of tour of the more advanced design ideas before shifting to a more damagecentric design at Nibelheim. Both parts of the phase are important, but the first part of the phase is clearly more interesting because of the different design ideas. Sample HO152 isn’t terribly exciting; it casts poison and has minions and is otherwise unremarkable. The Hundred Gunner/Heli Gunner and Rufus/Dark Nation fights are much more tactically varied. The Gunners fight the party at a long range, meaning that the only way for anyone other than Barret to attack them is to cast magic or use limit breaks repeatedly. The designers are simply forcing the player to do something other than use basic attacks, and to learn about rationing their MP pool as a part of that practice. Dark Nation will cast Barrier and MBarrier on Rufus, meaning that all of Cloud’s damage against him will be halved. I think it’s actually quite clever of the designers that they used barriers in a fight where Cloud can’t do anything about them. By forcing the player to play through a battle extended by barriers, the player gets the proper appreciation for what barriers can really do for his or her own party, and how important it is to get rid of them when the enemy has one (once this becomes possible).
Bottomswell and Jenova BIRTH are the two bosses that really stand out among the phase two lineup, but for totally different reasons. Bottomswell is unique among bosses in that it combines aspects of several earlier bosses into one. Although stacking up various challenges into one is one of the most orthodox design traditions in videogames, FF7 doesn’t do a lot of it. Bottomswell is the exception.

Want to read more? The rest of this section can be found in the print and eBook versions.
Quantifying the Game Script - Back | Next - Examining a Wide Level-Up System