Chapter 3: Quests Nine through Twelve
Quest 9 - Can't Stop the Dungeons
Stat of the Quest:The Tyrano Lair features, effectively, the biggest disparity between the HP of the final boss and the HP of the weakest enemy in the same dungeon. The Volcano has a perfectly reasonable amount of health for an enemy of its level, and not that much less than the average enemy in the Tyrano Lair. Yet, that enemy has only 1.9% of the health of the Azala/Tyrano combo.[8] The goal of this comparison is to show how the designers made the Tyrano fight feel longer and more epic by inflating his HP relative to the dungeon’s normal monsters. (Some provisos apply to this comparison: I discount the enemies that have 10 or less HP like the Shadow and Acid, as they unanimously have gimmicky defenses that belie their HP totals. I also discount the Decedents in Magus’ Castle, because as we pointed out in quest eight, they’re from an earlier quest, and are supposed to be cannon fodder for your tech points.)
Quest nine continues the relentless pace of dungeon content carried over from quest eight. There are new bits of NPC chatter in Ioka village, but of the 10 new pieces of chatter, eight simply direct the player toward the Tyrano Lair. There are some new weapons to be bartered for, but no new armor. Basically, there’s nothing substantial to do between Magus’s Lair and the next dungeon sequence, comprised of the Dactyl Nest and Tyrano Lair.
The battles in the Tyrano Lair are generally smaller than those in Magus’s Castle. The average number of enemies per encounter in the Lair is just over two, and the largest battle is four enemies. In Magus’s Castle, by contrast, the average number is just under four and the largest battle is six enemies. With one exception, the enemies in the Tyrano lair don’t have tons of HP or defense, and so don’t require the same party composition as Magus’s Castle. Part of the reason for this is that Ayla’s techs are underdeveloped; she has probably gained less than 100 total tech points during her last quest.[9] The quick, medium-sized battles help her to acquire some of her mid-level techs before the big boss fights to come, without requiring too much of the player.
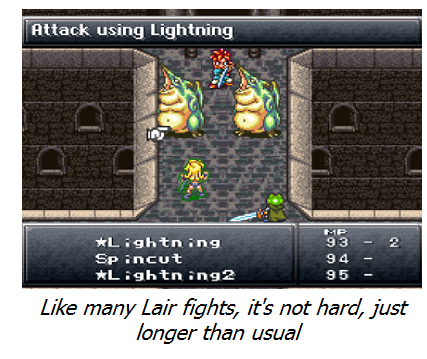
Only one regular enemy in this dungeon offers a significant challenge. The Terrasaur is almost like a boss in how much HP it has relative to normal enemies, plus its strong defense. The high defense can be mitigated; like Ogan, Juggler, and Megasaur, the Terrasaur has a triggered vulnerability. A single Lightning spell from Crono will greatly reduce the Terrasaur’s defense. To compensate for its high HP and defense, the Terrasaur is a slow enemy and doesn’t deal much damage. In that sense, this enemy is just another example of the dungeon’s overarching philosophy emphasizing battle length rather than battle difficulty.
The Tyrano Lair has two bosses, both interesting for their own reasons. The first boss, Nizbel 2, is a great example of the kind of iterative process I originally charted in Reverse Design: Super Mario World. Later in this book, there is an entire section on the way that families/categories of enemies evolve and expand. Nevertheless, I want to make mention of Nizbel 2 now as he represents one of the steepest evolutionary slopes, so to speak. Like the Terrasaur and the first Nizbel, Nizbel 2 belongs to the family of enemies that have triggered vulnerabilities. In fact, he is a direct iterative expansion of the first Nizbel battle. Nizbel 2’s defense is exceedingly high until he is struck by a Lightning spell. As soon as he is hit by a non-lightning spell, however, his defense regenerates. Thus, the player has to dedicate nearly all of Crono’s turns to triggering that vulnerability. Of all the rest of the bosses in the game, only the optional Retinite will require the player to exploit triggered vulnerability so often. Even the final battle with the Lavos Core, which also features triggered vulnerability, will not require such dedication.
The second boss fight, consisting of Azala and the Black Tyrano, is a little bit strange when compared to most of the other fights in the game. It is a fight with two sequential phases like the encounter with Magus and like that previous battle, the second phase is designed around one exceptionally powerful attack. In the only example of this in the entire game, phase one of the fight (Azala) is weak only to magic, while phase two (the Tyrano alone) is vulnerable to anything. Phase one is about attrition attacks, and phase two is about a big, fire-based attack. The strange thing about this attack—and really, the battle—is that it’s on a clearly delineated timer. Because the Tyrano only uses two attacks, one of which is obviously telegraphed, the player shouldn’t have much to fear. Even novice players will know to heal to full before the attack timer runs out. The designers had their reasons for doing this, however. The first reason is that such a big attack makes the fight feel epic. Although the Tyrano is not very dangerous because it is slow and obvious—it is the most powerful enemy in the game, up to that point. The second reason for the unique behavior of this boss is that stopping to heal makes the fight longer. This, combined with the Tyrano’s massive amount of HP (over 10,000) means that this fight is going to go on for a good long while. That long duration, however, is the whole point.
After two back-to-back dungeons, a series of long boss fights, and a couple of big plot twists, there’s a very good chance that the player will feel worn out. The long—but not particularly dangerous—Azala/Tyrano fight is just the final, climactic trick that the designers are using to make the player feel exhausted. This is entirely deliberate because the next quest is going to take advantage of that exhaustion to deliver
Quest 10 - How did we Get Here?
Stat of the Quest:It’s more of a list, really, but here are the five most crowded town screens in the game. (1) There are 24 people in Zeal Palace’s main room, (2) 12 in Enhasa, (3) 12 in Earthbound Commons, (4) 11 in Kajar’s main room, and (5) 11 in modern Guardia Castle. Four locations in the Kingdom of Zeal occupy the top spots on this list. This helps to explain why the Kingdom of Zeal feels so much grander than any previous location. It also explains why the designers felt comfortable telling the majority of the Zeal storyline through NPCs. There are an unusually high number of them, and they’re concentrated in obvious places.
Quest ten is easily the game’s most brilliant quest; it’s arguably one of the best quests in any RPG ever. Yet, in order to understand why this quest is so brilliant, we have to understand its place in the greater sequence of the game. So, for a moment, we’re going to take a break from our examination of individual quests and see the bigger picture of Chrono Trigger. We’ll look back at the quests that led up to this point to see how the overall pacing of the game makes this quest special.
Below is a diagram I call an amplitude map. The point of the amplitude map is to measure how two contrasting game design elements are balanced in a level, quest, or section of a game. The contrasting elements in Chrono Trigger are combat and exploration. Combat is simple to define: to calculate it, I have simply counted the number of enemies in each quest, including bosses, which are weighted based on their relative HP totals. That number is used as a score, which is visualized on the bottom of the figure below. Exploration is a little more complex; the exploration score for a given quest is calculated from newly available NPC chatter, slightly weighted so that NPCs the player has never met score higher than NPCs the player has already encountered (although both are only scored if they have something new to say in that quest). Additionally, any treasure chests available outside a dungeon are counted up and added to the exploration score. (In-dungeon chests are not counted, as they’re almost always right in front of the player’s face and they almost always require combat.) Over each quest is a total amplitude score, which combines the scores of the exploration and combat sections, giving us a final measure of how much content there is in each quest.
With this perspective, we’ll do a quick recap and analysis. Quest one features a lot of exploration and a large dungeon and has a total score of 117. It makes sense to begin with a big quest; it’s better to begin a game with a bang than to start too slowly. Quest two slows down a lot, and only has a score of 30, if you count the three questions asked at trial in the exploration score. We already examined how quest two does a lot of deceptive things to mislead players about what kind of game they’re playing. That’s an important little trick, but it takes place in a relatively brief quest. Quest three (amplitude 65) is a bit bigger, having two new “towns” and a decent number of combat encounters across the two segments of its dungeon. Quest four (amplitude 33) is slightly smaller because there is almost no exploration to be done at all. The bike race is a brief and rather tedious distraction, but it certainly doesn’t have the player exploring anything.
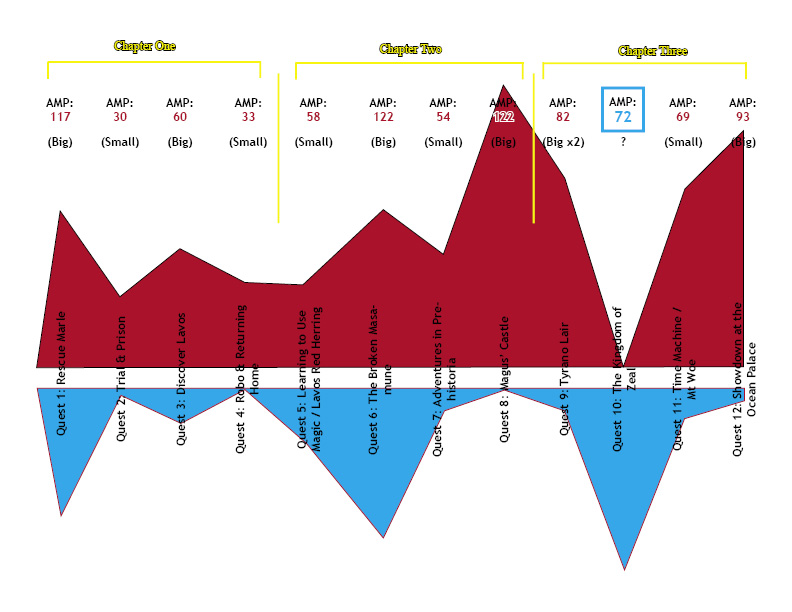
The amplitude measurement of the first four quests is: 117, 30, 65, and 33, in that order. Or, in other words, the game alternates large and small quests. That’s standard videogame pacing for a console game. The player may not have noticed this consciously, but the pattern is still important.
The first real turning point in the game’s pacing comes in quest five, when the player is given the use of magic and is first able to travel through time at will. To teach the player how to use magic without asking too much of him, quest five (amplitude 58) is a short quest, relative to the quests which come after it. The dungeon in quest five is also short. Quest six (amplitude 122) is huge, larger than anything the player has seen so far. That makes sense; quests ought to get longer and more challenging as the game goes on. But it’s not just dungeon content; there are a lot of new NPCs to speak to in Dorino and Porre. A lot of the old NPCs have new things to say. The first truly difficult boss is also found at the end of this quest. Quest seven (amplitude 54) is relatively small, although it affords the player some optional battles.
By now, the player should have a conscious sense that the game alternates large and small quests. Additionally, based on what the player has seen in the plot, he or she should expect that quest eight, Magus’s Castle, should be large. It is large (amplitude 122), and it’s almost entirely made up of dungeon content. There’s virtually no exploration (unless you count bringing Frog to Spekkio and learn magic), but it absolute delivers on the player’s expectation. This is where Chrono Trigger starts to toy with player expectations. After telling the player that stopping Magus was the main quest, the designers reveal a much larger scope to the game.
After priming the player to expect short quests in between large ones, that pattern too is subverted in quest nine. Quest nine (amplitude 82) puts the player right back into a big dungeon. In addition to tiring the player out a little bit, this change in the pattern should also ensure that the player doesn’t know what to expect. Especially when Lavos appears at the end the quest, once again changing the course of the story. This brings us to quest ten, which is the game’s most brilliant quest. This quest sends players through a mysterious gate, into the previously unknown Kingdom of Zeal. Using only text, it’s difficult to recreate the sense of total surprise that I, like most players, felt the first time we arrived in the Kingdom of Zeal. Obviously, the existence of this totally unknown civilization is a surprising twist in the plot.
Want to read more? The rest of this section can be found in the print and eBook versions. In fact, the print version of this book has been significantly expanded and revised.
Next - Grim Resolution and a New Beginning: Quests 13, 14 and Fiona's Forest.